|
Chimney repairs!
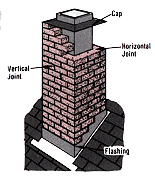
Although repairing a leaning chimney or one that is leaking smoke through the brick joints are jobs best left to a professional, there are some important repairs that anyone can perform. These include repairs to preserve the integrity of the brickwork and to avoid more serious and expensive work in the future. If your chimney has crumbling pointing or holes and cracks in the cap, doing the repairs yourself immediately will prevent further weakening and avoid the costly job of rebuilding or replacing it later. Getting up to the roof might require some time and effort because scaffolding is usually necessary, but the repairs themselves are straightforward tasks. Re pointing a Chimney: Re pointing does not require a great deal of mortar. Mortar Mix or Mason Mix is available in bags conveniently sized to provide just enough mortar for the present job or to have a little left over for other small jobs. Tools needed: Mortar Mix-Mason's 2 lb. hammer-3/8" chisel-brush-brick trowel-mortarboard-scaffolding-work gloves-safety glasses. Cleaning and Re pointing: Hold the chisel at a sharp angle to the joint while striking it with a hammer and knock out the crumbling joints to a depth of at least ½". Work the chisel along the joint about 1" at a time. Chip out vertical joints first, and then do horizontal joints. Brush any loose particles of dirt or mortar out of the joints. Dampen the joints. Prepare as much mortar as can be used in 1 hour and trowel it into the vertical joints first, then the horizontal joints. Strike the joints flat. After the mortar hardens, brush off any excess. In the course of re pointing, you might come across a loose brick or two that should be replaced. Use the chisel to remove the mortar from around the loose brick, and then lift it out. Scrape all loose or crumbling mortar from the hole. After cleaning the brick of any mortar and dirt, dampen the brick as well as those surrounding the cavity. Butter its top, bottom and both ends and press it back into the opening. Make sure the joints are completely filled and strike them flat. For Best Results: When working on or around any part of a chimney, be sure to close all dampers leading into it so if any soot is knocked loose it will not enter the house. Repairing the Cap: Brush out any loose particles, dirt, and organic matter from cracks and holes in the cap. Dampen the crack or hole and trowel in fresh mortar to fill it flush with the surrounding surface. Mortar can be used to fill any cracks between the cap and the flue liner. The cap should be replaced only if it is badly cracked or if the mortar is so loose that it is pulling away from the brickwork. Use the hammer and chisel to chip the cap away in pieces. For safety, lower the pieces in a bucket instead of just letting them fly off the roof. Brush away all dirt and loose particles. Trowel on the fresh mortar in several thick layers, sloping the cap down from the flue liner to the outside edges of the stack. For Best Results: Use safety glasses or goggles and gloves if the repairs are going to require extensive concrete chipping. Eye injuries and scaffolding work can be a very dangerous combination. Flashing Repair: Chimney flashing should be inspected if there are interior water stains in the area of the chimney. IF the flashing is loose, simple re pointing is needed; if the flashing has deteriorated, it will have to be replaced. re pointing Flashing: Rake out loose and crumbling mortar from the joints where the flashing and chimney stack meet. Brush any loose particles and dust out of the joint. Dampen the interior of the joint and any remaining mortar. Pack fresh mortar into the joint with the pointing trowel. After the mortar has set slightly, strike the joint flat with the slicker. For Best Results: If both vertical and horizontal joints have to be re pointed around the flashing, re point the vertical joints first.
Go to chimney / info
I built this site with all the tools from Solo Build It. Click on the Site Sell Target below to see how you can too!
Webmaster!
|