|
Barbeque Pit!
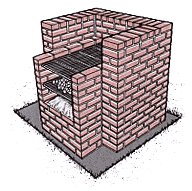
Brick: A backyard barbecue pit can be a useful and nice addition to any home, no matter what the design is! A barbecue pit should be located, wherever it is most convenient and safe for children and possibly in a corner of a patio top ensure a solid base. You can choose from brick or concrete block which can be veneered for a matching look to your home. Tools needed: Block layers trowel, float, screed, shovel, hoe, mixing box, hawk, and level. First, measure and stake off the desired area and size of the barbecue pit you have chosen. Layout the size of the footer and check it for square and level reference. After you have it laid out you can now excavate the area to a depth of 4 inches deep and 16 inches wide. Make these dimensions square and level. Once you have poured your footer (see block design below), draw an outline of the barbecue pit on the footer, leaving at least 2" all around and again make sure it is square and you mark all the low spots so you know what is needed for the first course mortar to make it level. Dry stack the first two courses to make sure your pattern works; remember to allow ½" for the mortar joints between bricks.Begin building the barbecue by laying up the corners. The first course is laid up in a bed of mortar and this course is the most important and it must be level and square as it is the reference for the rest of the courses. This mortar bed is where you make up for the differences in the footer itself. Build up four courses high and then fill in from each corner. Once you have the barbecue sides laid up you can now add a thin layer of loose gravel inside the bricks on the bottom. This now needs to be compacted and mixing sand in with it will make it more solid. Compacting can be done with the end of a 2 x 4 and just use a tamping motion. This also needs to be level. Next, mark up four inches around the inside wall from the stone and make a level line on all walls either with a level or a chalk line. This is your reference point for the top of the concrete. Then pour a 4" thick slab using a fiber-reinforced concrete bag mix. Note: This slab can be slightly sloped to the front to let rain water run out instead of pooling on the surface and will also make it easier to remove ashes. A hand level is used to keep the walls plumb and the rows of brick level. Excess mortar is scraped off with the trowel two or three rows at a time and then the joint is pointed up as the mortar begins to set. As construction proceeds, insert 4" lengths of re bar in the fresh mortar joints to support the grills at the levels you desire. Top off the walls with solid bricks. You can remove any excess mortar with a stiff fiber brush and also clean the bricks from top to bottom as needed. Block design: For an economical barbecue that is quick and easy to build, consider the following one made with concrete blocks or you can modify the design to suit your needs. To start, you excavate an area 24" wider and 8" deeper than the length and combined widths of the grill dimensions. Dig to a depth of about 4", keeping the edges as straight and square as possible. You can drive metal pins (cut re bar) approx every two feet vertically and level the tops of these with your level for your grade height. You can then screed your concrete to the top of these pins and when completed they are driven below the surface before the concrete sets up. Place the concrete in the excavation for the footer, screed and float the concrete and then let it damp-cure for 3 to 4 days for strength. Note: This concrete can be mixed a little on the wet side as it will allow you to float it level much easier! Next, you can dry stack the first course of blocks on the cured footer to determine their correct placement on the footer. Begin at one end, interlocking the sidewalls with the back wall. Mark the location of the footer. Lay ½" bed of mortar on the footer and set the first course in it, beginning at the same end and butting the blocks together. Make certain that this course is straight and level and is on the chalk lines place on the footer for the dimensions. Correct as needed as this is the reference for the rest of the project!Stack the remaining blocks in a running bond (overlapping pattern, half of the block), interlocking all the walls together. Stack the grill walls 5 courses high, and the counter wall 4 courses high, making certain to place them plumb on the course below. Place the steel hangers in the grill sidewalls after the second, third, and fourth courses; place them in the counter sidewalls after the third course. Once completed you can now apply a parge coating to the outside walls with a mortar mix or finish as you so desire.Note: This is meant as a guide for your project. If this level of construction is more than you want to tackle, please consult a local professional contractor.
Go to barbeque / smoker grill!
I built this site using all the tools from Solo Build It. Click on the Site Sell Target below to see how you can too!
Webmaster!
|