|
Concrete Sidewalk!
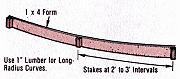
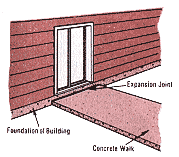
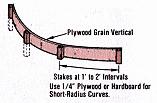
A private sidewalk leading to the front entrance of a home should be 3' to 4' wide and more if a handicapped entrance is needed. Curbing may need to be sectioned out from an existing sidewalk for wheelchairs etc so that the finish blends into the street level smoothly. Service walks connecting to back or side entrances can be 2' to 3' wide and all should be a minimum of 4" in thickness. Simple slabs for small foundations, bases, etc., normally 4" to 6" thick, depending on the load they must bear. Slope the walk away from buildings to provide proper drainage and slopes of ¼” per foot are generally recommended, but check local codes and conditions. Tip: To get started you can use a regular garden hose to layout the sidewalk design you would like to have. I.E curves and turns etc. The hose is flexible and can be changed easily until you are happy with the results. Then you place your stakes and begin excavation. Site Preparation: Stake out the area for the sidewalk or slab, using a T square, measuring tape and twine. Use a line level to ensure proper placement and slope of lines. Remove the dirt to the desired depth. Remember to allow for the width of the forming lumber so the width of the sidewalk will be what you wanted when completed. Place and nail the forms in place using double head “simplex “nails. You may have to dig a slight trench to set the forms at the correct height. Then, you can back fill against the forms to ensure stability and use the level to check for proper slope. Notice that when held level, the right end of the level is about ½" above the outside form, indicating a slight slope away from the building. Tamp the sub base firm and then check for proper form depth. For larger jobs, or in areas of poor drainage, dig to a greater depth and add several inches of gravel or crushed stone to the sub base. It may be desirable to add wire mesh reinforcement to the form. Support the mesh on small stones so it is suspended at the midpoint in the slab and as you pour the concrete you need to pull the wire up off of the bottom so it is in the middle of the sidewalk for strength. Dampen the sub grade before making the pour. Cover all areas with plastic sheeting as to avoid concrete splatters on the surrounding structures. Spread the concrete throughout the sidewalk form, working it in tight against corners and edges. You can lightly tap the outside of the form with a hammer to vibrate the concrete and eliminate honey comb on the sides of the concrete. This will give a nice finished look. Next you can screed off the concrete level with the top of the forms using the screed board. Fill in any low spots as you work. Several passes may be needed and screed it in both directions. If it is too stiff you need to add a small amount of water to the mix to make it easier to work for the next batch. Float the sidewalk surface smooth, using a wooden or metal float or “Darby”. Swing the tool in circles, holding the leading edge of the tool up slightly to keep it from digging into the concrete. Float the entire slab. Stop floating when the entire slap in fairly smooth and the float leaves not visible marks. These tools bring the “soup” to the surface to give a final finish to the slab. All stone and gravel in the mix should have been worked below the surface. Cut the concrete away from the forms by running and edging tool along the forms to compact the slab edges. Using a straight edge as a guide, cut 1" deep control joints into the slab every 6' to 8' using a grooving tool. Properly cure the concrete with Acrylic Concrete Cure & Seal. After the sidewalk has hardened sufficiently (48 hours or so) carefully remove the forms. For Best Results once the sidewalk has formed a hard skin you can now keep it wet by hosing it regularly with a fine mist just enough to keep it wet and not damage the “soup” on top. This is very important if the slab is in direct sunlight while curing. Make curved forms using ¼" plywood, kerfed lumber, or sheet metal. It’s important to keep the top of the form smooth and even for the screed board to slide on. This will reduce your hand tooling work as you go along. Note: When a coarse finish is desired for nonskid footing, floating, edging and grooving may be the only steps performed. When a denser, smoother finish is required the surface is troweled once or several times with a stainless steel trowel. Troweling takes place after the surface moisture has evaporated from the surface and the concrete has lost its sheen. This setting time may vary greatly with weather conditions and the moisture hours. Thirty minutes to an hour is average in most cases. Once the concrete has set up, swing the trowel in the same circular pressing and polishing motion that was used in floating. Continue working until the surface is smooth and dense. You can let the concrete to continue to harden and then trowel once more for the densest possible finish or use a wide shop broom for a non skid surface which is desirable for cold climates with snow. After troweling, redo edges and grooves.Properly cure the concrete with Acrylic Concrete Cure & Seal. After the concrete has hardened sufficiently (48 hours or so) carefully remove the forms. Final notes: A concrete slab has low tensile strength and is subject to cracking unless steps are taken to prevent it. To help control stress buildup and the cracking it causes, three types of joints are used in concrete work. Control joints crack at the base of the control joint, rather than across the face of the slab. They can be hand tooled in fresh concrete or sawn into hardened concrete. Control joints should penetrate roughly ¼ of the slab thickness and be spaced every 6' to 8' in 4"-thick slab work. Wide driveways and patios may require longitudinal control joints down their centers. Add expansion joints to help dissipate the expansion and contraction forces that pass between adjoining structures. Professional finishers use a metal material called key way that is installed as the slab is being formed and is an integral part of the slab when cured. Also, use bituminous fiber strips (expansion joints) wherever concrete meets existing structure, such as a foundation, wall, or other slab. Expansion joints should also be placed around posts, pillars, or other major protrusions. Construction joints are inserted where concrete placement is stopped for 30 minutes or more or along the perimeter of the day's work. Construction joints are located and built to act as control joints. Install a lumber bulkhead across the form, place concrete to this point, and finish its leading edge with your jointing tool. When work is resumed, remove the bulkhead, place the adjoining section of concrete, and finish the second edge to complete the control joint. On level, stable ground, simple butt joints are fine for 4"-thick slabs. For thicker slabs, or work on unstable bases, use a tongue and groove type construction joint. It will help tie the slabs together and keep them level with each other.
I built this site using all the tools from Solo Build It. Click on the Site Sell Target below to see how you can too!
Webmaster!
|