|
Building a professional surface plate!
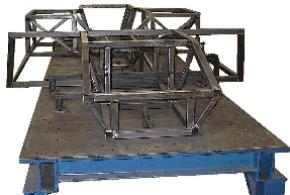
Surface plate:The three most accurate things to consider when designing and fabricating this project are accuracy, strength and rigidity . You can never have too much of these. Your design will vary depending on whether you will be building and welding one frame or mass producing a lot of them and if they will all be different or the same as each other. A structure made of 2 by 2, 2 by 3,or 3 by 3 mild steel box tubing is how most surface plates are built. Some people also use pieces of I-beam, eight to ten inches deep as the basis for a surface plate to construct everything from frame rails for welding and fabricating street rods, custom dune buggy frames to motorcycle frames. With an accurate surface plate for a square and level reference point you can professionally custom fabricate almost any project. Click here for free engineering to help you get started on your new project! The height for your surface plate can be from twenty inches top to floor or higher depending on the work you will be doing. I.E. You don't want to work all day bent over a surface plate when it can be more comfortable a little taller. Up to three feet if you leave it open. A low design is better suited to building frames for dragsters, dune buggy frames and door cars with roll cages. You need six leveling screws. Two on the feet on each corner and two located in the center. These are located about 12 inches in from each corner on the long side of the bottom. If you have to put the frame jig on wheels, you might consider using inflatable tires. Once its moved you re-level it with the four jack screws and your ready to go! A serious frame jig is anchored to the floor for strength and rigidity . If you build the frame using fixtures that locate the frame far enough above the base, you can weld all over it, and you can always pull your custom project out of the jig to work on small areas underneath after everything else is solid and then put it back in the jig to keep it square and aligned for further work. Next you cut and install a perfectly flat piece of half inch steel (minimum) plate with a straight line scribed down the exact center. This can be fabricated by a reputable machine shop with a series of tapped holes (1/2") in a left to right, front to back series to locate the fixtures on it. Two to four inch spacing on these holes is ideal.This is the best method to attach all of your fixtures. Using two holes per fixture is recommended!! You can simply remove them to do another project or different job you may have in the future. This plate must be tack welded sparingly so as not to warp or draw. The best method is to drill and use counter sink bolts to mount it to the main frame so that the plate remains flush. This is installed after the main frame is leveled. You can build it however you like, but if you want to have good results, remember accuracy rigidity and strength are king! Once it is built, located and leveled a periodic check for level is done before you start the next custom project each and every time!! Never, never use the structure to pry against with a come along to pull something straight, or use a porta power to bend what you are working on against or from the plate! When you do this it knocks the table surface out of reference. From then on the measurements are only close, not accurate! If it needs bent or moved, cut it or move it to a place off the jig so you can adjust it to what you need. Don't use the surface plate for this no matter what!! Don't ruin your investment! :-( The last thing to do is paint the entire structure less the actual top of the plate itself. This is left as bare metal and should always have a light coat of oil kept on it to stop corrosion. Also, keep all your fixtures painted and they will be easier to use. Hint! Paint each projects fixtures a separate color and it will speed up your change over time from custom project to custom project. You now have a work table that you can build anything. From a custom motorcycle frame, motorcycle trailer, car trailer, utility trailer, dune buggy, go cart, to a Nascar Race Car. Build any metal project of any kind and being able to clamp down and hold anything you are working on that needs to be accurate including wood. All you need to do is build a fixture to hold it right and your on your way to another custom built project! :) Finally, below you will find some pics to guide you through your building process.
I built this site using all the tools from Site Sell! Click here for free info on how you can too!
Webmaster!
|